2023 Update: As my dining room trim work design starts getting underway, my construction strategy is to begin at the edges and work my way into the core of the room. So, near the top of the “start-building-it’” list is framing-out the dining room archway – and I’m planning to use wide fluted casings, rosettes and plinth blocks.
The initial archway is shown below.
Plain, boring and completely stark!
I know I’ve conveyed my opinions on trim work in previous articles and videos, but I truly think architectural trim projects add massive impact to any living area – perhaps even more than furnishings. The sophistication you can add with efforts like these are subtle but distinct. And if you have the time and patience – you can be as creative and elaborate as you wish.
So, let’s start with the first challenge here: finding the right materials…

Finding the right Casings, Moldings and Rosettes
Going to the hardware store with a vision in mind may sound nice and straight forward, but once you’re hit with 17 types of casing, 22 different crown molding styles and all kinds of additional trim work accessories (like rosettes and plinth block variants) – it can all get kind of blurry pretty fast.
The only way to deal with this, I find, is to pick out a bunch of items you sort-of think you might like – and bring them home.

In most reputable stores, you can return what you don’t use, so don’t even try to size things out on your first visit to the lumberyard or hardware store – just walk in planning to leave with a bunch of samples that you can view for yourself in your own house, holding them up to your own walls.
And then you decide.
(For years, the larger hardware stores stocked wallpaper books for this very reason. You could sign a few of these books out and take them home with you to see the paper you “thought” you liked in the room you were planning to renovate. In this way, you could feel a lot more confident about your purchase. This isn’t the case so much anymore – but you can still do it at smaller wallpaper stores. And with trim work, I just buy samples & return them with exactly the same mindset. Simple and effective – as long as you validate you can return what’s not used!)
Trim Work Painting Preparation
Painting (or really pre-painting) certain wall areas and trim pieces can be extremely beneficial for you as you progress in your project, so before anything gets cut or nailed up, I always give this some very careful consideration.
Below is a video I shot that explains (and shows) the reasons for this.
While I really want you to spend the three minutes watching this to get the feel for what I mean, I must apologize in advance for the sound quality – it was the first time I was on camera. What I learned was that when shooting a video, you really need to speak loud – and to be sure to face the camera… ;-)
In the shot that follows – you can see exactly how I gave these fluted casings the three coats of semi-gloss. I use my saw horses all the time (there are -so- many options at that previous Amazon link) with all types of projects. And the painter’s plastic is a must as well if you have any concerns about keeping things neat; it’s cheap, covers a large area – and it’s disposable.

Fluted Casing Archway Construction
With the material acquisition and pre-painting work completed, it’s now time to have the fun…
Setting Up the Power Tools and Key Hand Tools
I set up my compound miter saw someplace convenient, but outside so there’s no dust in the house. The compressor and finish nailer are each prepared and assembled. And I get some of the key hand tools I want to have on-hand nearby – setting things up for easy access: things like my torpedo level, carpenter’s level, a sharp red pencil and tape measure to name a few.


Once I have these ready to go – the only remaining item (for me) is a tall, hot cup of coffee. Have to stay focused. Plus, I really like my coffee.
Positioning and Nailing the Plinth Blocks
Starting with a plinth block, as you can see below – I use the torpedo level to position this as vertically true. (You cannot rely on the edge of the archway being perfectly vertical – though it should surely be close.) I push the non-chamfered side down to the carpet, but not too hard – you don’t want to pinch the carpet there permanently.
Then with my nail gun, I drive 4 nails into this block – and I repeat on the other side of the archway as well.

Key Point to Note & Anticipate: The plinth blocks are essentially aligned with the edge of the archway. The casing that will be installed above will be centered over the plinth blocks – and will thus *not* be aligned with the edge of the archway – they’ll be slightly inset (as the casing is slightly skinnier than the plinth block.) The exposed portion of the edge of the archway that will remain uncovered is called a “reveal.”
Cutting, Positioning and Nailing the Casings
With my first piece of [pre-painted] fluted casing, I start by cutting this to the proper length for one side of my archway. In my case, one piece will not be long enough to meet the rosette I plan to install above – so I know I’m going to have to splice with another piece of casing.
When splicing moldings, you want to angle-cut for the best look.
So… I anticipate this, by pre-cutting the top at a 45-degree angle with my miter saw.

Once I’ve made this cut, I position my casing over the center of the plinth block (leaving the small “reveal” you can see on the left slide in the shot below), and with the fluted casing positioned vertically true with my level – I nail to the wall as shown.

How many nails should you put into this piece of casing? Well – I don’t know if there’s a hard and fast rule for this, but what I do is a) ensure the molding is rock solid on the wall and b) use as few nails as possible. (Every single nail you use will have to be finished later – very tediously. So, you don’t want to go too crazy with that nail gun!)
Here’s a shot of the nail density from my casing – and all of these nails went into studs behind. You can see I alternate sides and spanned about 6 inches or so.

The right hand side of my archway is now starting to form nicely – you can see the casing and plinth block interface nicely in the photo that follows.

Positioning & Nailing the Rosettes
In the photo below, the bottom left corner of the rosette is positioned exactly into the corner of the archway. Take a close look to see what I mean. The rosette is leveled, of course, and I drew guide lines with my sharp red pencil so I could get this “just right.”
Then I nailed it up neatly. (There’s one on each side of my archway.)

Splicing the Fluted Casing
For my archway, as I mentioned earlier, my casings aren’t long enough to make it without a splice – so, it’s now time to complete the casings by splicing-in some additional length.
The miter saw is great for precise cuts like this (I wouldn’t recommend trying this with a miter box), and you can see how I finish off the right hand side of the archway casing – now running from plinth block to rosette in the two shots that follow:


Similar splicing efforts are needed on the other side of my archway as well…


Finish Work: Sanding, Wood Filler & Final Painting
Now, back to more tedious work – but we’re in the home stretch for sure.
All splices need to be sanded (as needed) to as close-to-perfection as possible:

All countersink nails are filled with wood filler, as are any open spaces between any of the molding splices or joints (casing-to-rosette or casing-to-plinth-block):

And when the wood filler cures – a final coat of paint finishes off the archway…

Final Dining Room Archway – One Step Closer…
And here we are now – the finished archway is depicted in the final photo that follows.

This archway is only one part of my dining room trim work design. (You can already see, for example, crown moldings and ornate corner blocks in the photo above as well.) You can visit the link above to see more about what I’m striving for – or you can watch the video below, which illustrates the “larger vision.”
I have to say – my dining room, overall, is definitely inching closer to this end vision. And I’m even starting to think about the first dinner we may be hosting in there. Still quite a bit of work to do, but we’re chipping away: slowly and as meticulously as possible!
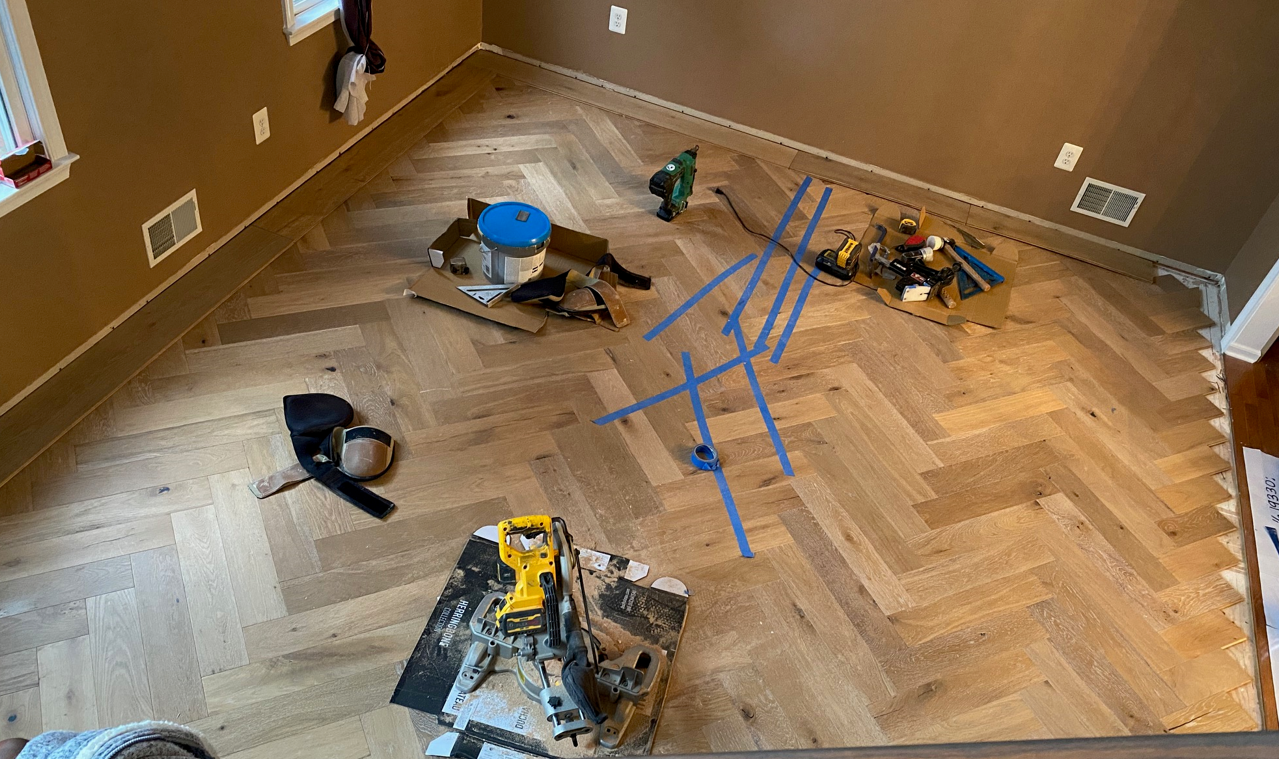
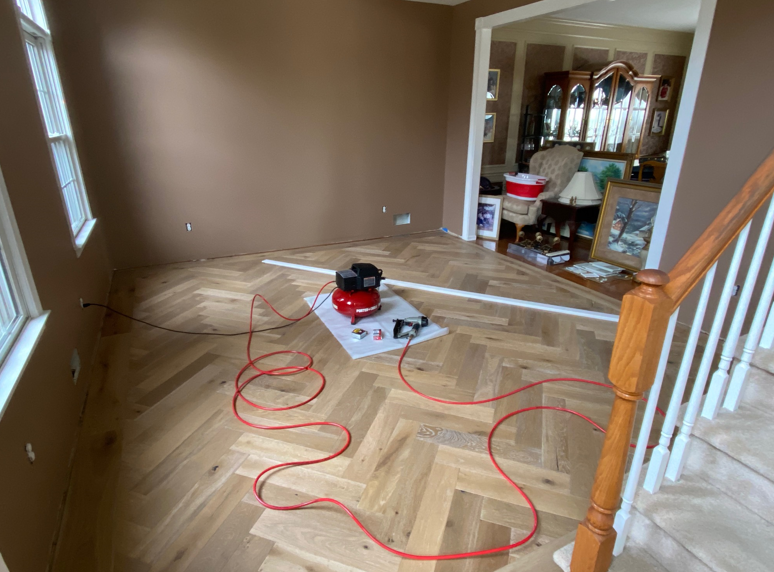
2023 Update: Well, it’s now 5+ years since I wrote this article, and below are a couple of ‘new’ photos (from last week), as I’ve been rehabbing further. Check out the herringbone floor we just added to this room. But if you look to the back of the second photo… there it is: the archway that was done in the article above. And on this side of the room? I painted it white. That’s the beauty of work like this to me; it can be evolved indefinitely – the classic architectural trim nuances (plinth blocks, rosettes, fluted casings) are truly timeless.
And if I’m to be less ‘formal’ about it – they’re truly AWESOME.
I’ll be installing base moldings today…

I’m a newbie- this is very helpful!!!!