When you own a home, toilet replacement (and toilet maintenance and toilet repair) – all come with the territory.
You can always hire a plumber to help, of course, but even if you do – it’s still best to know what it takes to get something done yourself. What follows is a little chronicle of one Saturday afternoon at my house, and my toilet replacement adventure. Fun? Well, I wouldn’t go that far. But I think this is actually a nice job to tackle as the steps are pretty clear, and it’s not really as gross as you might think. [Replacing a sink drain (or trap), in my experience, is generally nastier and smellier than replacing a bathroom toilet!]
My upstairs toilet had some hairline cracks in the tank since we moved into the house. I had patched with silicone a couple of times, but after ten years when it started leaking for the third time – we decided to just rip the whole thing out and start from scratch.
Before You Start Toilet Shopping
There are plenty of options for buying a replacement toilet, but before you start shopping there’s one key measurement you need to make. You need to know the distance from the wall to the drain pipe underneath the bowl. If you get this wrong, you could buy the wrong toilet – and you don’t want to waste your time and energy with something that can be avoided with a 1-minute measurement.
On the very bottom of the existing bowl, there are plastic caps: one on each side. Measure the distance from this cap to the wall. The cap marks the approximate center of the drain pipe, and you can see I show a 12-inch measurement below. (The tape measure actually shows a little less, as it’s not reaching the wall – but stops at the base molding. You want to measure to the wall.)

The two common distances are 12-inch and 10-inch, but there may surely be other possibilities.
Toilet Replacement: Tools & Materials for the Job
I bought the toilet below as it had great reviews on Amazon, and it also came with a wax seal and a new seat – all packaged right in the single box. In theory, you can flush some large number of golf balls down this toilet: it’s designed to prevent clogs. My daughter wanted to try it… flushing a dozen golf balls right down.
I patiently suggested that we probably shouldn’t!
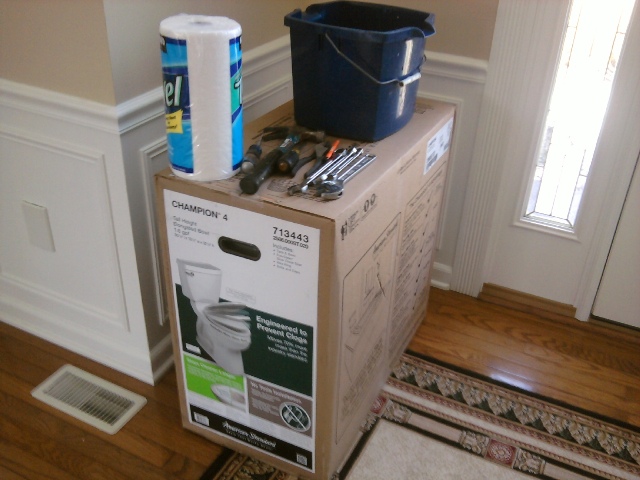
Toilet Replacement Tool & Material Checklist:
- A New Bathroom Toilet (So, so many options – focus on the reviews!)
- A New Wax Seal
- A Flex Toilet Water Connector (For a few dollars, replace in a heartbeat if needed.)
- Paper Towels
- A Bucket
- Screwdrivers and wrenches (I always have an adjustable wrench handy)
- A New Toilet Seat (If one isn’t provided with your new toilet)
Once you have your new toilet home, find the manual in the box. The manufacturer will tell you exactly what you need for the installation. Collect up all of your tools, and I always have a bucket and a roll of paper towels for any plumbing job as well. Because, you and the floor both will get a little wet!
Also – make sure your new toilet comes with a new wax seal. If it doesn’t, you’ll need to consult the manual to determine the best seal (wax ring) to purchase. You cannot install a toilet without a new wax seal. They’re cheap – but of paramount importance. Never reuse an old wax seal.
3 “Toilet Tips” to Consider as You Get Started
Tip 1: Even though I made my distance measurement and bought another 12-inch toilet, I’ve learned not to trust anything. I’m a cynic. With that in mind, I find it prudent to do a very crude assembly of the new tank & bowl and simply validate (before I start messing with anything involving water) that I’ll have the clearance I really need – that the new toilet will truly fit into the existing space.

Tip 2: Know exactly where your house’s main water turn-off valve is located. Because if anything goes wrong and you need to stop the flow of water, that won’t be the best time to try to figure out where the main turn-off valve might be. Before you start any plumbing job, you really need to know how to turn off the primary water supply. Just in case!
Tip 3: Take care to keep the box from the new toilet intact. This is just a personal preference, really, but when you’re all done here – you’ll need to put your old toilet out with the trash. Depending on where you live, it may sit there for a while. I *hate* the thought of a toilet sitting in front of my house! So, I pack the old toilet neatly into the new toilet box before I put it out for bulk garbage pick-up. A brown box has much better “curb appeal” than an actual bowl, right? ;-)
Ripping Out that Old Toilet
Locate the water line feeding into your toilet’s tank, and use the “turn-off” to stop the water supply. Then, flush the toilet and watch that the tank doesn’t refill. It shouldn’t. Once you feel pretty good that there’s truly no water being supplied to the toilet, you can remove the water line from the tank; you can usually do this by hand – but you might need a little help getting it started with pliers of some kind. (Take care not to damage the water line as you’ll be able to reuse it.) Note how I have the bucket positioned in the photo that follows. Some water will surely spill here.

Even though you know you have the “turn-off” in the off position, take a close look at the water line now. If there’s *any* water coming out at all (even a very slow drip) – position this over your bucket. The turn-offs don’t always work perfectly.
Now, you can begin removing the toilet from the floor. The two plastic caps will pop off (with the help of a straight screwdriver if necessary) and underneath each, you’ll find a nut that can be easily loosened and removed.

If you’re lucky, you can now easily lift the toilet right off the floor. I’m not usually lucky here, though. There seem to be two schools of thought regarding toilet installation. Some feel it’s good to caulk around the toilet, while others do not. I’m in the latter camp for reasons I’ll describe when we get to the installation. But if there’s caulk around the base when you’re trying to remove your toilet, it’s frankly going to be a little bit of a pain. Just go slow and easy. Use a razor knife and/or a hammer & chisel as shown below. Be very careful to avoid scratching or chipping your floor, though.

Once you get a little leverage, you may be able to use it as shown in the next shot. Again, though – be ultra-careful with the floor.

And eventually – the toilet will come right up, revealing the drain pipe and old wax seal below.

Get some paper towel, and remove the wax seal from the drain pipe. It will come up in chunks, and try not to touch it with your bare hands as this is the only part that can definitely be a little disgusting. Clean everything as meticulously as you can – the floor, and especially the metal ring where the new wax seal will soon be installed. The wax seal is the “integrity” of the toilet: everything passes through here.
To say it another way – it’s the wax seal that keeps everything from spilling out onto your floor when you flush. It’s very important!
You’ll also note there are two bolts sticking up through this metal collar – they can be removed and put aside; your new toilet will provide 2 new such bolts.


New Toilet Installation in 6 Steps…
Follow your manufacturer’s instructions now, but in essence the six steps will go pretty much like this…
Step 1: Install the New Wax Ring & Bowl
This is imperative, and you want to do this once and right – so be sure you understand exactly what’s going to happen before you try it. The new seal (wax ring) should be positioned carefully and pressed firmly so that it sticks to the bottom of the new bowl. Then, before positioning the bowl – the 2 new bolts (included with your new toilet) must be inserted into the metal collar that surrounds the drain pipe so that you’ll eventually be able to secure the new bowl to the floor. Once the bolts are in place (and are sticking straight up), and the wax seal is stuck to the bottom of the toilet – you need to lift the bowl, carefully passing the 2 bolts through the holes in the porcelain base – and then (only then) firmly press the bowl to the floor, compressing the wax seal.
You do not want to rip this up and try it a second time once you’ve compressed the wax seal.
(This is why it’s so important to do this once and right.)

I usually attach whatever type of nut the manufacturer provides to hold the toilet to the floor – but only loosely at this point. It’s not time to tighten this all down yet…

Step 2: Install the Toilet Tank
There will be some bolts and a rubber seal of some kind that will need to be installed on your tank and will facilitate the connectivity to the bowl beneath. You can see the two bolts and rubber gasket from my tank in the next shot.

Follow the specific instructions for your toilet and connect the tank to the bowl. Be careful not to tighten too much, as you’re connecting porcelain to porcelain here. It can crack if you over-tighten. In fact, this is probably what caused the hairline cracks in my original toilet – I suspect one of the bolts was simply over-tightened when originally installed.
Step 3: Position and Secure the Toilet Overall
If you look at the picture below carefully, you’ll note that the top of the tank in not parallel to the wall. This becomes very clear once the tank is installed, though it’s not really very obvious from the earlier step of bowl installation. This is why you want to avoid tightening the bottom bolts to the floor until now.

Gently twist the bowl (don’t lift – just twist slowly) until the tank aligns nicely with the wall behind. Then, you can tighten down the nuts provided by your manufacturer and add the new caps as well. Here once again, be careful not to over-tighten. Plastic nuts (like the one shown below) help to distribute the force and minimize the risk of cracking. But still, keep it reasonable.

Step 4: Attach the Water Line and Test
You want to hand-tighten the water line to the toilet, but you can give it just a little extra partial twist with piers as long as you don’t get too overzealous. Turn the water supply back on, and the tank should now fill. Here’s where you now need to do some testing. Dry the floor around the water line and the base of the toilet perfectly. Flush the toilet a few times, and ensure you see no water around the base. Carefully inspect the water line connections to the toilet and to the turn-off and check for signs of leaks there as well.
I usually leave paper towels around the toilet and under the water line for at least 24 hours, inspecting periodically for any signs of water.

Step 5: To Caulk or Not to Caulk?
I’ll never caulk. Caulking will perhaps give a slightly nicer aesthetic look if anyone happens to be lying on your bathroom floor. But, what caulk might also do is mask a leak that develops. Imagine what would happen if your wax seal gets damaged in some way, and water (and other stuff) starts leaking under your toilet. You want to know about this as soon as possible, of course, but you wouldn’t see it very easily if the toilet was caulked tightly to the floor. Where will that water go, then? Well, if you have an upstairs bathroom and it gets to the floor beneath, it has lots of places it can go. And cause damage.
Nope – for me, I want to know if there’s a leak as soon as possible. I’ll never caulk.
Plenty of toilets are surely caulked to the floor, though, including this one (from the original installation) as you saw above. Some feel you should caulk partially but leave an area uncaulked for quick leak detection – and this is another possibility you might consider, especially if there’s a good aesthetic reason to do so.
Step 6: Install the Toilet Seat
This last step is only mentioned for completeness, as we’re essentially done now. The seat gets added per the specific seat-manufacturer instructions; there will be two plastic bolts of some kind that connect essentially as shown below. It varies slightly from seat-to-seat.


And we’re good to go. Another Saturday, and another job checked off the list! Lots more on deck for next weekend, though. And next month. And next spring.
Sometimes, I must admit, I might miss living in an apartment – just a little bit. Is it just me?
Other tips, opinions and general ‘toilet wisdom’ anyone can contribute below??

I remember having to replace my own toilet once, it was fairly difficult. It’s also something that I would suggest you don’t do alone either, have a second person ready to help you out. One of the reasons for the second person is lifting the old and new toilet. They are decently heavy and large/awkward to hold on to. Plus, if you drop it, it breaks off chunks of itself and the floor.
I agree that a second person can surely be helpful, Phil, especially with removing the old [fully assembled] toilet – which always seems to have just a little bit of water sloshing around in the tank as well. But what’s -definitely- imperative, to your last comment, is NOT dropping a toilet onto the floor. Oh, yeah – that’s not gonna be good on ANY front! :)