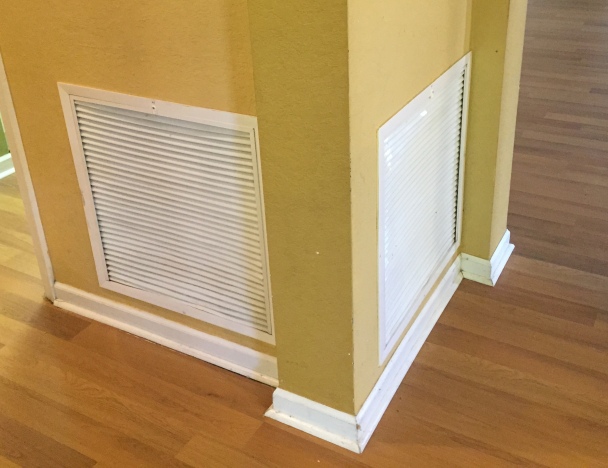
Both central air conditioning return vent covers were smashed. Oddly smashed. I could almost picture a toddler on a Fisher Price trike having a blast slamming into them repeatedly… because nothing else really seemed to fit the damage I was seeing.
But no matter what really happened, we were preparing the home for rental in a beautiful neighborhood, and the return vent covers definitely had to be replaced. They were the largest returns in the home, unfortunately, and the grills each held HVAC filters too. So, they were going to be a little expensive. But they were unsightly. And since we were painting the entire home interior as well, the timing was perfect to do everything once and right.
The return vents in any HVAC system can take on many different forms/shapes and will be found in numerous locations throughout the home. In essence, return vents are for air being pulled back into the air conditioning (and heating) system. It’s not uncommon to hear the terms register, grill or return somewhat interchangeably – but generally speaking, the HVAC system ducts are covered with grills – and those grilled ducts that are used to pull air back into the system are the returns.
Home Rehab Surprises
At first glance, when arriving at the home, things didn’t really look so terrible.
There was nothing functionally wrong with the HVAC return vent covers. But as always with rehab efforts, the more you get into the home, under the sinks, into the attic, trying all of the plumbing fixtures, electrical outlets and appliances – the more you discover.
It can frankly be a fun process, as long as the discoveries stay within budget and aren’t too terrible, of course…
(A tree root through the sewer line, for example: NOT Cool!)
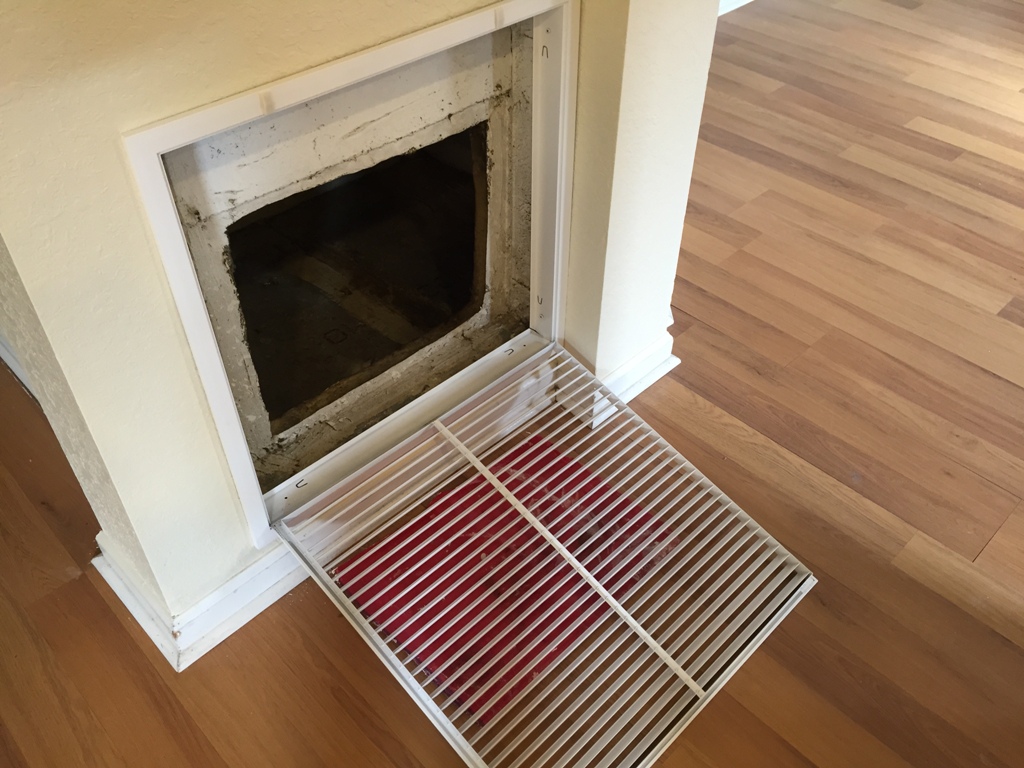
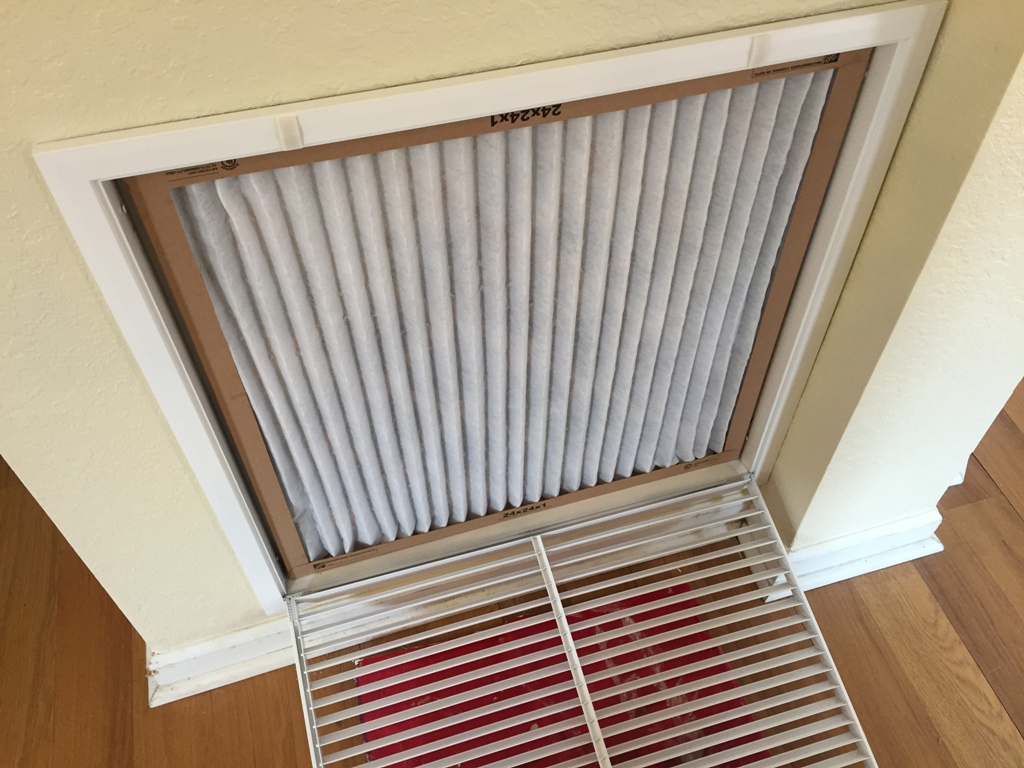
But opening the first return vent cover to remove the HVAC air filter made it even more clear, these were both well-worth replacing. Not only were they banged up so much that they had warped the filters within, but they were just plain dirty. Not something I would want in my home.
Finding and Buying Replacement Return Vent Covers
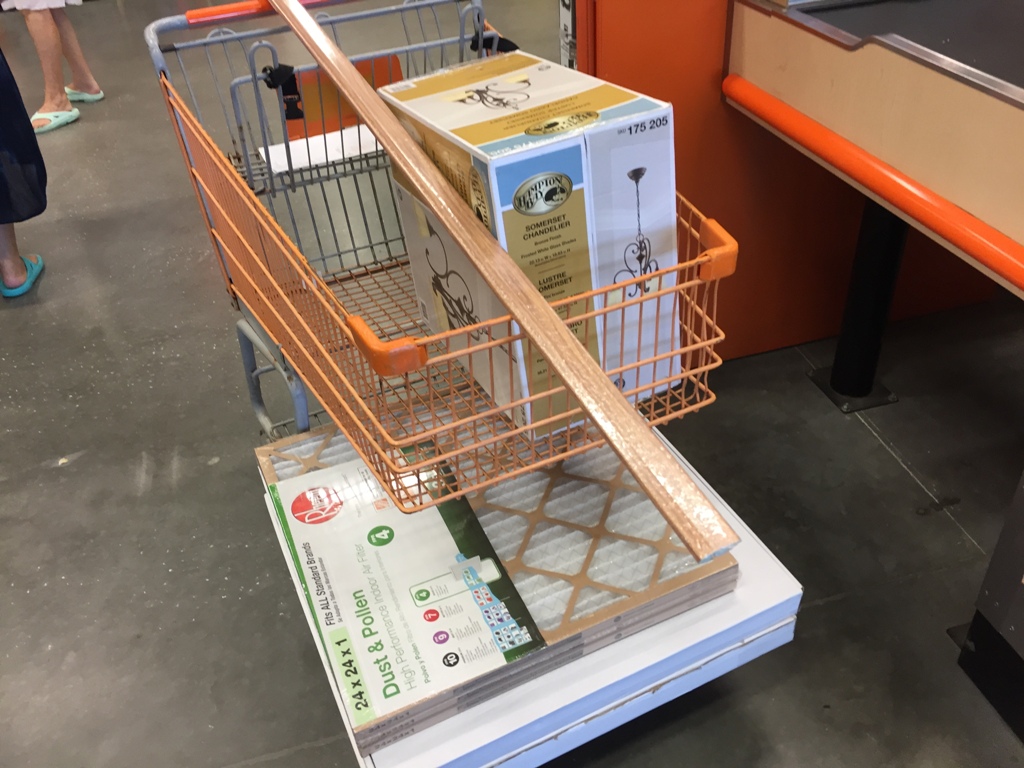
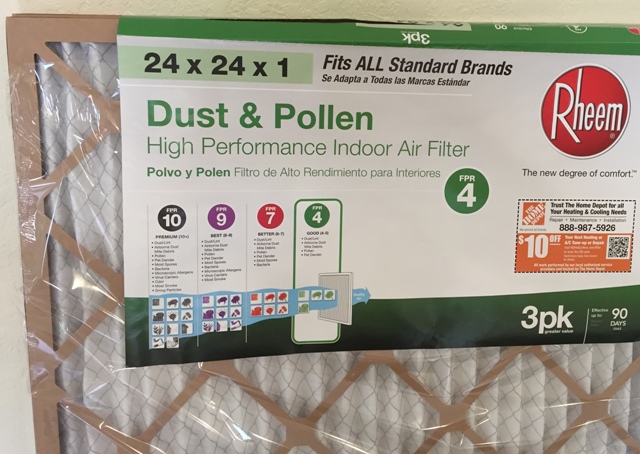
One of the many hardware store runs easily provided the right return vent covers, shown at the bottom of the cart below along with a package of replacement air filters just on top. We were addressing a long list of replacements and repairs at this home as it had been vacant for several months and we really wanted to clean and spruce it up; the hardwood flooring [transition] strip and new light fixture you can also see were just a couple of the other items.
With return vent covers, I find it’s prudent to not-only bring photos and dimensions – but to also have one of the original covers with you as well. I had one of the damaged covers out in the truck; I wanted to make 100% sure I was getting exactly what was needed because there can be a lot of variations with these covers. If you have the time (I didn’t), you can definitely even order these on line in advance, with your original vent cover in hand. Scanning all the buyer reviews, naturally, before committing to a final purchase; I absolutely love Amazon for this reason.
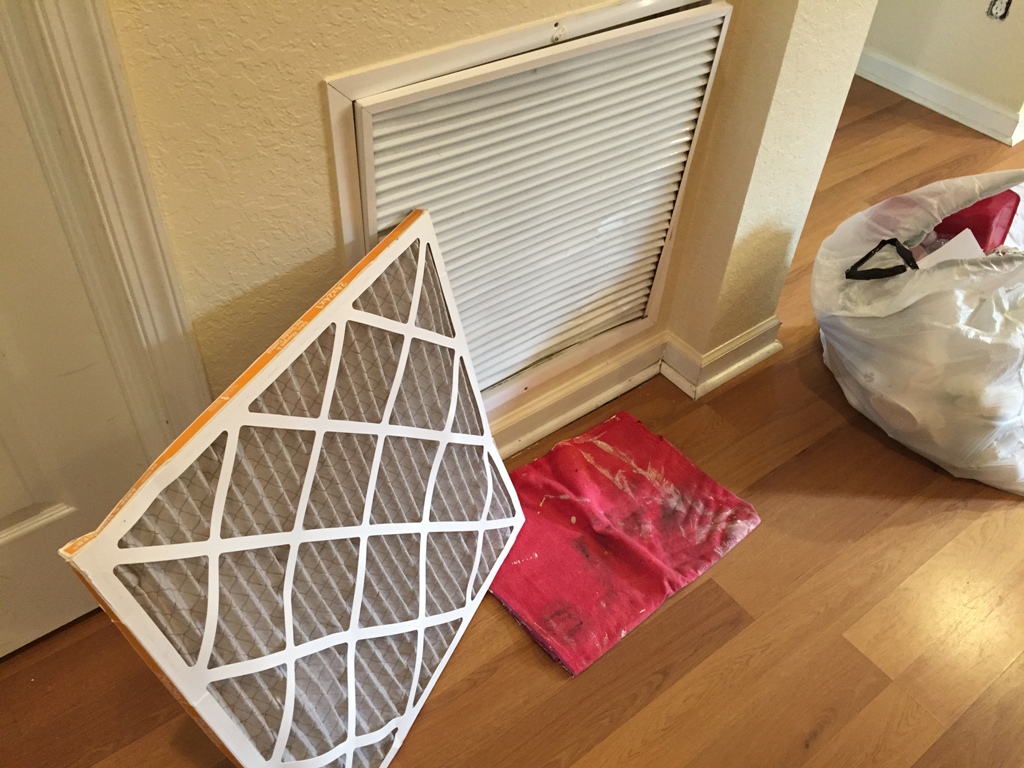
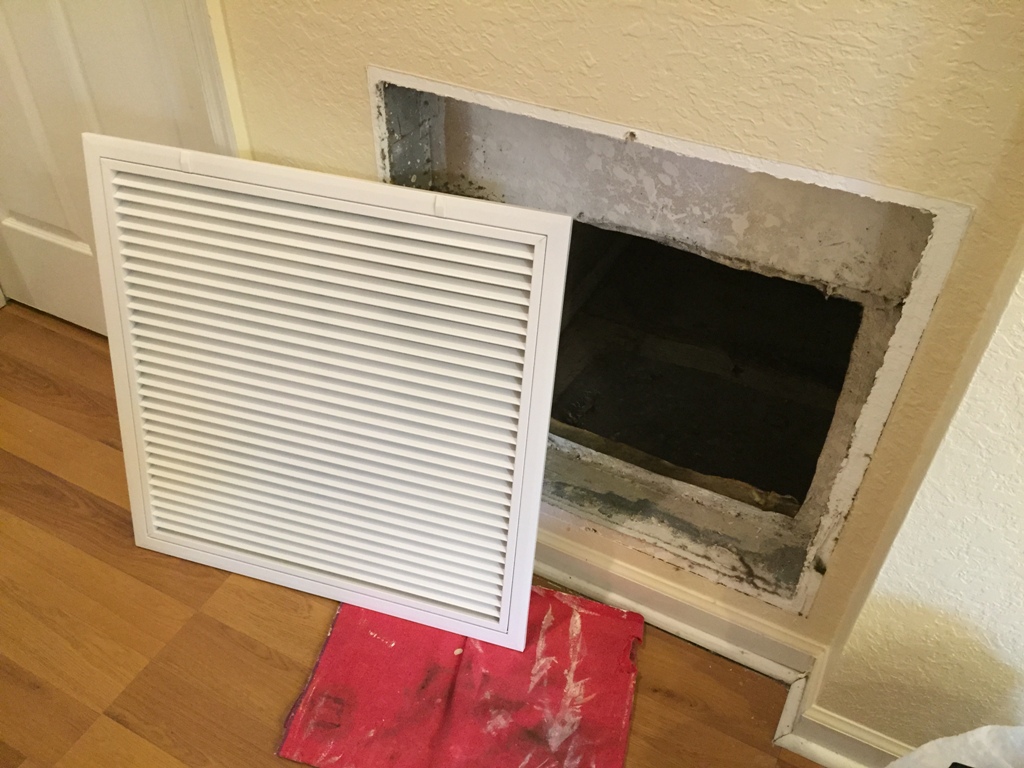
One of my nice, new and meticulously clean replacement return vent covers is shown below, leaning against the freshly painted wall. I’m now ready to begin the replacement.
Removing the Damaged Return Vent Covers
In hindsight, I really should have removed both of the damaged return vent covers before the walls were painted. But given the way things unfolded on this project, that wasn’t an option – and so I had to be particularly careful with the new paint. And frankly, even if we didn’t repaint the walls, it’s always prudent to score the paint with a sharp razor knife before trying to pull off any kind of fixture like this, otherwise the paint could tear – and you could end up with something else to fix.
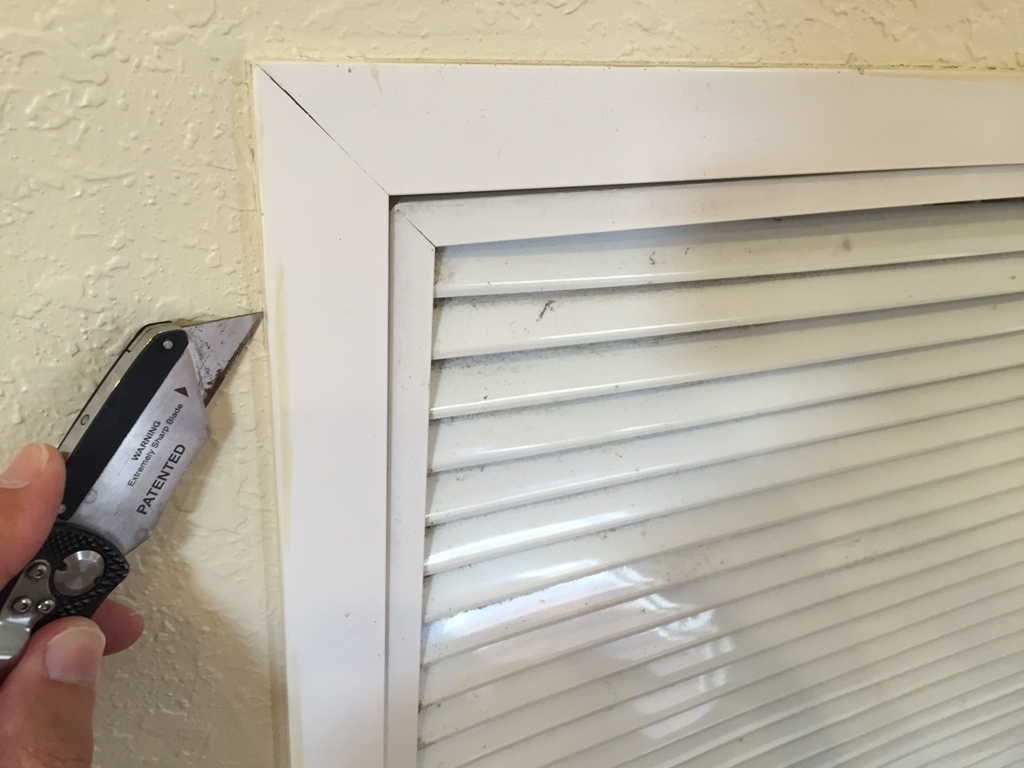
I know that sometimes it’s not easy to catch subtle damage in photos, but in the shot above you can see a bit more on how dented up these HVAC return vent covers really were. How the heck could this really have happened?
(It looks like it was hit with a baseball bat to me!)
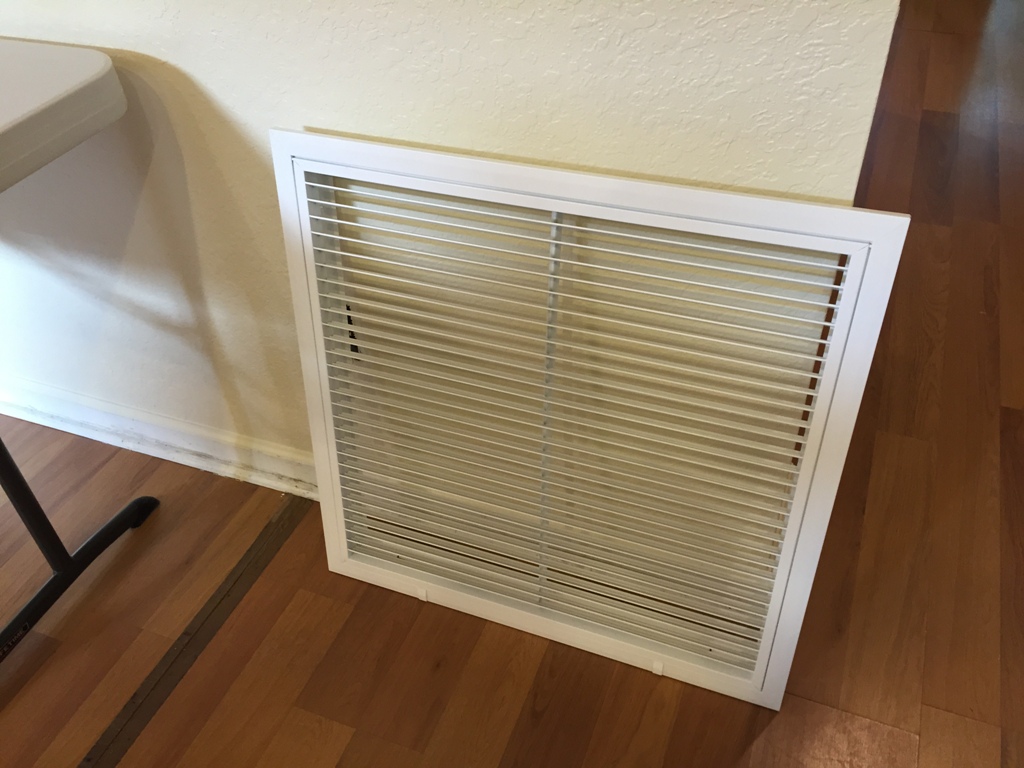
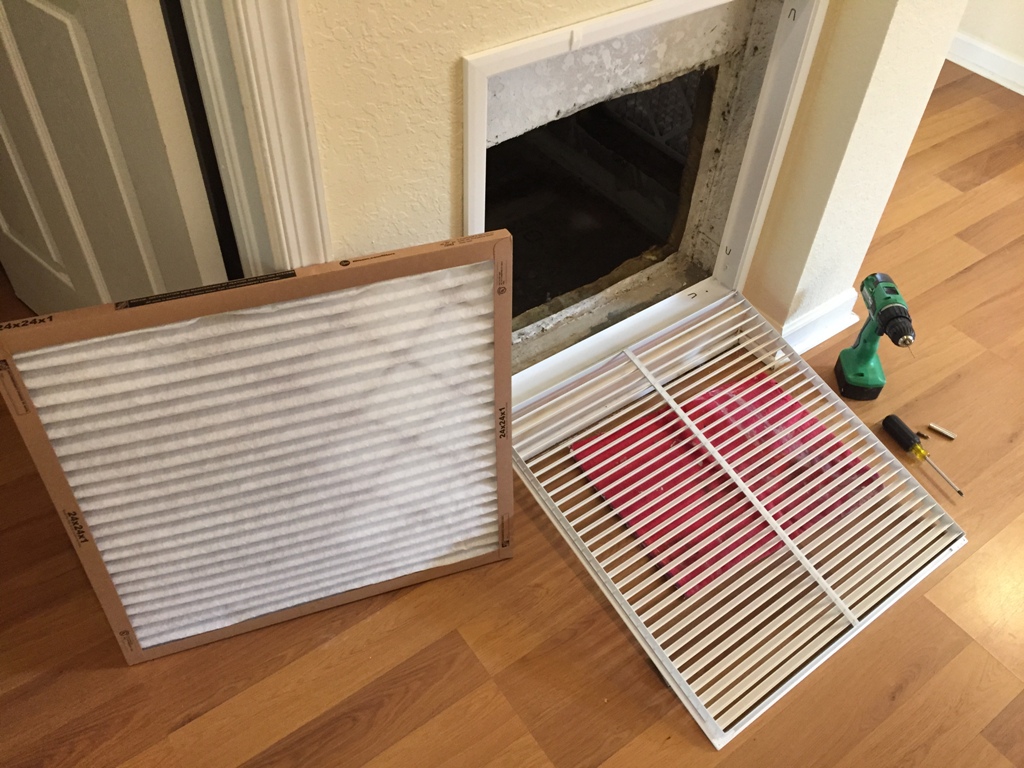
The old covers are both removed, each held in by a few wood screws to the studs behind, and now it’s time to install the new replacement covers.
HVAC Return Vent Cover Installation
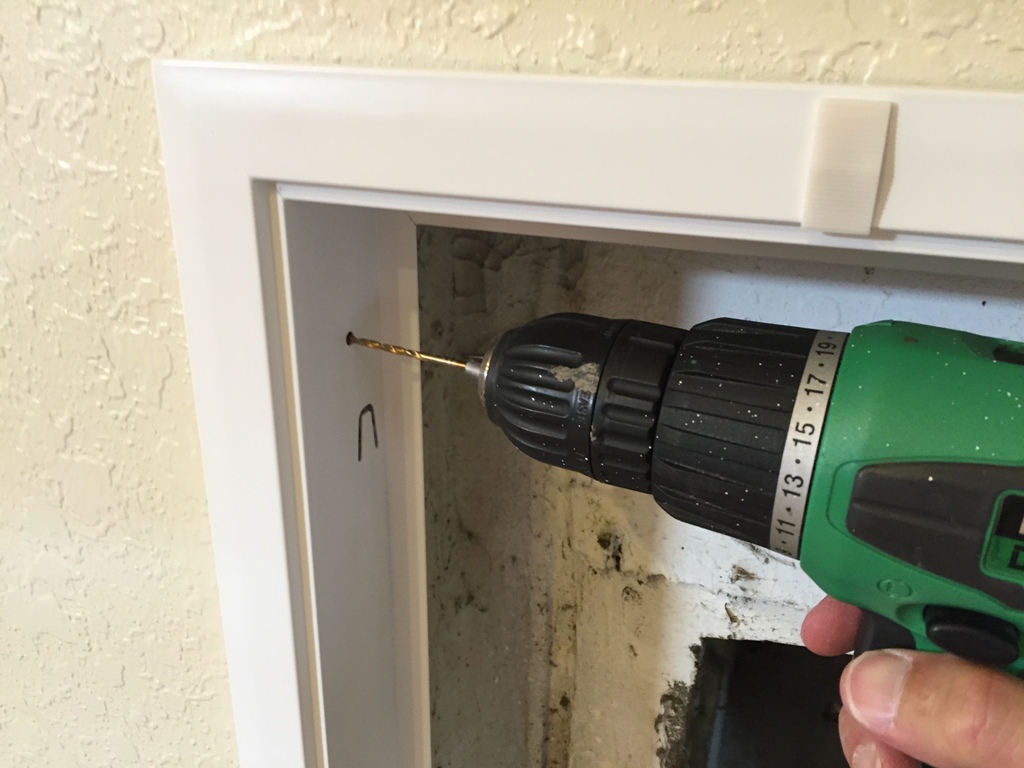
The covers are positioned and some pilot holes are drilled into the wood behind.
Fortunately for me, the new covers covered up the paint color discontinuity completely, so I didn’t have to worry at all about the difference. This saves me about 10 minutes of touch up painting… and, hey, we’ll take it!
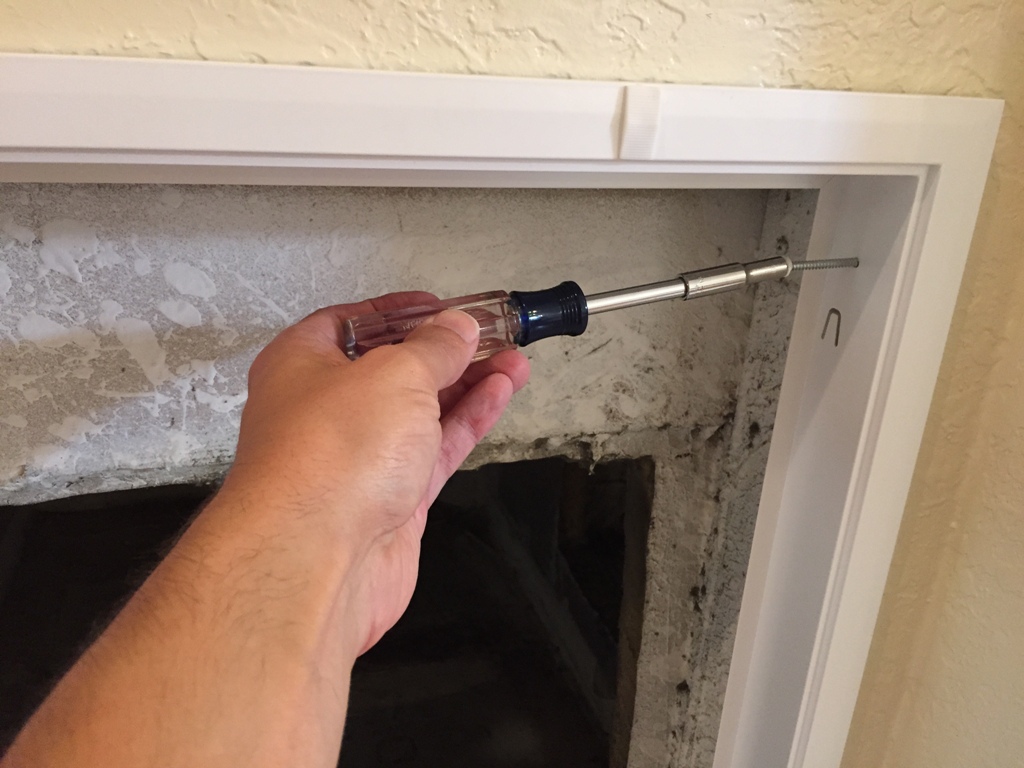
The wood screws are installed, securing the new cover nicely…
Once in place, these particular HVAC return vent covers hinge outward as shown – and the system air filters are held firmly within the outer grill.
HVAC Air Filter Considerations
Now, with the air filters, there are only a few things to be concerned with. First, you have to be sure you get the right size of course – and the air filters are all very prominently marked as you can see below. But here again, there are many, many variants – so be careful you truly get exactly the right size. The old air filter, as filthy as it may be, is the best source of the sizing.
(HVAC air filters aren’t always installed within the return vent covers as we found in this particular home, by the way. They can very commonly be installed within your furnace as well, making this part of my particular installation irrelevant in some cases – but it’s still worth pointing out here.)
In addition to the size, the air filters come in various grades as well.
The filter shown above is primarily for dust, and it’s a pleated air filter which is quite common. But there are higher grades for particular allergens as well. And in all cases, there will be a replacement interval recommendation which should be taken seriously, especially for the higher grade HVAC air filters. One tip that’s well worth considering: when you install a new air filter, write the date on it. In this way, when you go to replace it 45 or 60 days later – you can be sure your timing is correct.
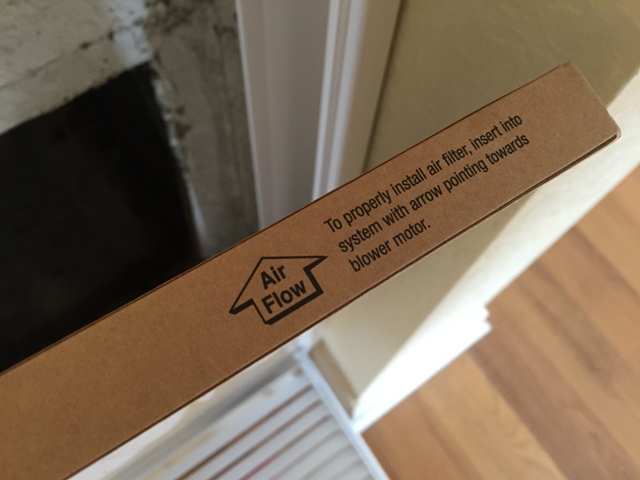
The final thing which is VERY important is the seating of the HVAC air filter. They must be installed for proper air flow – and as you can see below, there will be a directional indication marked on the filter itself. Be sure to install your air filter, whether within an HVAC return vent cover or elsewhere, in the proper direction.
Once seated properly, everything should be nice and snug.
The return vent cover is mounted securely to the studs supporting the vent, and the air filter is firmly in place (but not warped in any way) within the supporting portion of the cover.
Closing things up for both new HVAC return vent covers conceals all of the internal detail, and we’re good to go for the new tenants. Fresh paint, new air filters – and brand new [aesthetically “boring” but no longer ugly and dirty] vent covers.
That are NOT to be used for target practice anymore.
(Hopefully.)

What the heck could really have banged up those covers like that??

Harmonic resonance may be why these vents were damaged. When the frequency of the airflow or system operation matches the natural vibration frequency of a vent, it results in a throbbing, buzzing, or humming sound.
Making a small change to the shape of the vents is the most expedient way to eliminate the noise. However, using something more finely calibrated than a boot is preferable.
Simple harmonic motion has been known to collapse bridges as well, indeed! Now, I’m not sure if that’s ever happened in the town of Bedrock. But it SURELY could have. I think a boot could work wonderfully – but if experimenting with this theory, I might go with a needle nose pliers first. Interesting and excellent suggestion, Fred. I’ll be sure to share this with Mr. Slate and Barney next time we’re at the lodge!
My return register suddenly started making a high-pitched whine after 30 years. I discovered that if I opened the door/face of the register the noise was gone. I replaced the entire register and the noise is still there, until I remove the door/face. My research indicates several remedies. One is to use pliers to straighten the louvers so they are not angled. Another recommends getting an aluminum register, rather than one made of steel. I have also researched magnetic wood covers that don’t have louvers, but rather a decorative flat design that attaches magnetically to the frame. What remedy do you recommend?
Wow, Judy – you’ve hit squarely on what I’ve often thought-of as the ‘most frustrating’ class of problems! The eternal and intolerable… vibration/buzz. Given that you’ve already changed the entire register, I’m going to circle back to something I did several years ago that worked. On… a car.
I had just purchased a car I was exceptionally happy with, and I added louvers to to back window. I was young. The car was red. It NEEDED louvers. And… they vibrated. It was making me crazy. Other people noticed as well; this was not my goal. :)
I created tiny ‘foam’ shock absorbers, as basic as that may sound. I could see them in my rear view mirror when inside the car. You could not see them from the outside, and they killed the vibration. I only needed two. It cost me exactly $0. And then I felt so much better about driving girls in my cool red ‘sporty’ car. (I mean, I felt better OVERALL – but mostly I wasn’t embarrassed anymore!)
Perhaps experiment with something like this? You can find tiny felt pads at any hardware store or try scrap packing material; the trick is making the ‘fix’ invisible – and finding the key spots that are vibrating for the dampening. I, for one, would NOT bend the metal louvers.
Good Luck!!! (Truly – this drives me ABSOLUTELY nuts; I ‘feel’ your pain, quite personally.)
Can you please report back when you can??
It will make me feel better too!
Hey Mark, here’s something I have done for well over 50 years. And it was from the back of a can of pledge furniture polish.
When ever you replace your furnace filter give a good heavy coat of Pledge, this will greatly improve dust collection. But the filter will need to be checked once a month for replacement because this is like putting it on steroids.
This is a GREAT article however, I’ve always been told not to install a filter in the return air vent. My house, built in 1957/split level/vent in upper hallway, has the worst dust of any house I’ve ever lived! In 20 years I’ve contemplated inserting a filter to catch the source from the intake but always told not to. Your article gives me hope except my vent is 32″ w x 16″ H. AND, to further complicate things, the hole in the drywall seems to be too big for the vent cover and 2 out of 8 screws don’t’ even attach the to wall! [eyes rolling]
I like the idea of the aforementioned hinged return vent covers with filters but I can’t locate one to fit my current vent. Everything in this house has been just as the movie “The Money Pit”… simple things cost an arm and a leg and are not ‘simple’ to remedy. I feel this is just another one of those things I can not retrofit.
So, 3 questions here:
1. Can a new hinged return air grill with a filter be installed here? I also have an AprilAire system attached to the furnace now also. Not sure how that would impact a return air grille update.
2. If so, then where might I buy one the size I need?
3. In the family room is a ceiling return air vent whose grille outside measurements are 15.5″ x 7.5″. Inside 13″x5”. Can that be replaced with a hinged one with a filter?
Thank you in advance!!
Wow Joyce –
This is an exceptionally crafted list of pointed, contextualized questions; you write like an engineer. And that said, let me do my best here to respond… but I fear, relative to the “Money Pit” comment (been there!!), you may not like some of what I’m about to say. Okay – here goes:
Some up-front thoughts/comments to ponder first…
+ Have you ever had your duct work cleaned? I state for you to ‘ingest only’ for the moment. I had this done in a 3 bedroom, 2 bath house from 2002. About 20 years old when I had it done. It had a pretty BIG impact.
+ I never heard of placement requirements on the HVAC filters, but what I’ve seen over numerous houses is… variability. The house I’m writing about above? They were located exactly as you see – I replaced them, but they were there from the original construction. My current home? The filter is inches from the fan/blower motor – within the air handler. Another house I worked at? In the ceiling return vent; that one surprised me – and that’s your Q3. Hence – I’ve seen ‘variability.’
+ On ‘screws’ being too small for existing holes? That’s correctable. But let’s hold that thought for the moment. Because…
Here’s what I would recommend:
I suggest finding a local and VERY highly regarded HVAC company to come out and do an assessment. Your list of questions is perfect. By ‘find’ them – the ultra-best way is via word of mouth depending on where you live. I, personally, like to deal with the owners of all companies I engage – hence I’m going back to your list of questions: those are perfect for ‘that person’ to see. Start there. They’ll want to come out and get eyes on your system. Assess the age, the health, and surely the duct work too.
You can definitely find hinged vent covers… even on Amazon. In fact, I gave a link to someone that asked a comparable question below if you scan down. Maybe ~3-4 years ago. But you have to have those dimensions ‘just right’ for sure! And this is why I’m suggesting you get someone to your home on this. Your issue feels potentially ‘holistic’ to me. Hence, I’m suggesting it would be better assessed overall – and in person.
So back to that “Money Pit” comment now… I deeply understand that feeling. I strongly suspect you can do a retrofit of some kind for the filters and covers. But recommend getting an in-person assessment on the root cause of the chronic dust and overall HVAC system health first.
I hope this helps a little – even though I know it’s probably not what you were hoping I would say!! Best of luck to you,
Mark
Have a question. Just replaced intakes and one that I replaced downstairs was vertical but now vents are horizontal. Does that matter? I want to think they were the way they were for a reason. Husband and I are debating about that. My HVAC guy will be coming for fall soon and I am sure he will tell me.
Thanks, Ronda
Hi Rhonda –
I think it matters a -tiny- bit as it will impact the direction of air flow leaving that specific vent cover, but I have to stress the word ‘tiny’ there. Where I, personally, think it may matter a LOT… is that one vent cover won’t match the directional orientation of all the others. So, does it look good to you both?
Yup – I just went to home decor considerations over thermodynamic considerations!
But if that one old vent cover was louvered left/right or up/down, different from all the others, and you can ‘feel’ an impact in your air flow in that room, you might want to consider it. My OCD-tendencies would truly be at war though. Best of luck to you both!!
Hello,
By removing the vent cover on top of the entrance and the air filter I see like a sort of metallic accordion rolled up. It looks like it is locked from inside to stay rolled/or compressed. And I am guessing it can be rolled down. For what purpose I have zero idea maybe someone can explain. Location is south Florida. This thing takes about 3 inches in the top of the air return and in my opinion eliminating those 3 inch in top of the entrance would increase obviously the airflow volume, so air would flow more easy… No idea and cannot find anywhere on internet what that could be … or if it’s removable!? Maybe someone knows some information to explain what it is. I would really appreciate. Thank you.
Mark – Hey, I hope that you are still active on this thread because I could definitely use some of your knowledge for my HVAC conundrum!
So, for starters, I live in a 2011 Buccaneer double-wide manufactured home. I’ve lived here for 10ish years, it was purchased brand-new, and have honestly never been too sure about the HVAC and its maintenance or upkeep which is why I am seeking your help! Is it normal for a unit to have (2) return air vents, on the same wall just on different sides? And also, would a unit use (2) return air vent filters + a coil filter? I am all sorts of confused. Please help!
Hi Jessica –
Let me answer your questions first, and then I’ll give my opinion after that.
First off, yes. It’s totally possible to have 2 return air vents in the same wall, on different sides – and both needing filters. In fact, in the article above – that’s precisely what you see. (I’m not sure I called it out explicitly, but that’s what I’m addressing there.) Now, regarding a ‘coil filter,’ I’m not too sure what you mean by that – but let me get to my opinion now, which I hope you find more helpful…
Opinion: If you were my sister asking the same questions, and I couldn’t come over to check myself, here’s what I’d say: If you haven’t had an HVAC company there in over 10 years – get one there. Well before summer when the demand is highest. Pay them to assess and ‘tune up’ your system. AND… stay with them while they do it – ask them to show you what to do. Your air filter (filters?) is almost surely right before your air handler – meaning the unit inside your home. Where exactly? Can’t be sure… but most often right below it. And the filter is probably completely filthy after 10 years; you want to replace air filters every 3 months or so. Beyond that, though, there are other critical parts of the system – there’s the condenser unit (outside) which needs some cleaning as well, and there’s an evaporator coil (inside the air handler) that may need attention too.
That all said, find a reputable HVAC company. (You can start at that link I just put in, if you don’t have one already.) Get them over. If they simply need to replace your filter (and show you how) – it may be a $70 visit. But after 10 years, I’d expect more with good probability. There are 2 other articles on this site focused on more detail in these areas if you want to check them out first. I’ll put links below. And again, if you don’t have an HVAC company, you can start at the link at the beginning of this paragraph for pre-screened local folks by you.
BUT… be sure to check out their on-line reviews before you hire one.
Hope this helps a bit!
https://www.all-about-the-house.com/how-to-clean-outdoor-ac-unit-better-cooling/
https://www.all-about-the-house.com/inspecting-cleaning-hvac-evaporator-coil/
Hey, such a good informative article, I really need to replace my vent cover. Really old house, hinged at the base and not one of the hooks at the top latch. So if I remove the cover, and order a new one with same dimensions, it’ll come as a complete set right? New latches, frame, etc? I’ve ordered new filters, but I imagine I need to have the whole system and underneath the house cleaned?
Be careful with the above, Laura, for sure.
If there’s any ambiguity at all, it might be safer taking the dimensions from your old unit and a couple of photos [on your phone] to a local hardware store. And making sure you get exactly what you need – the entire unit, as you see me installing in this article. The frame, the hinges, the latch, etc. You can surely buy covers alone – as you see being cleaned in the comment below. Those are just… covers. You need the entire unit.
So, you’re asking a GREAT question.
Here’s a focused Amazon search link for hinged return vent covers – which will get you closer to what you need. But getting the dimensions exactly right is critical… and the orientation of the hinges and latch, potentially too.
If you have a number of these throughout your house, I bet after you do one… you’ll want to do all of them. And I’d surely recommend getting an HVAC company in to assess your system – and clean your duct work as well. Especially if you’ve just moved in. Best of luck!
Quick Update on Vent Cover CLEANING – By means of a comment, as this doesn’t really align with the article above; this is about cleaning dirt build-up to help keep your air quality higher. Recently, while working in another house, we removed some of these AC vent covers – and they were just plain disgusting. They probably had never been cleaned, ever. A handyman I was working with [shout out to Jerry!] said he knew a nice way to clean them. The cleaner & de-greaser is shown in the second photo below. (You can click the link just prior if you want to see the Amazon details.) The first photo is the dirty vent cover in the kitchen sink. The last 2 show the cleaning progress. It worked so well, I wanted to share here. (Please pay NO ATTENTION to the beer in the background of the second shot. We do not wish to condone drinking while cleaning HVAC vent covers!) But – for what it’s worth, in case anyone is interested in a nice way to periodically clean these…
This was a good article but our house was built in 1958 so our vent is in the ceiling where it is permanently hooked on one side and the other opens downward for easy access to replace air filter. Problem is the latch broke off and it vibrates up there horribly and only can keep it up there with tape lol and it vibrates terribly – HELP
Would help a lot with a picture, Deborah – perhaps you can send one through the Contact Page if you can and I’ll put up in here? But – two immediate first thoughts: 1) Sometimes [just sometimes] a small piece [or a few pieces] of carefully-shaped and placed Styrofoam can dampen vibrations like that… it rarely lasts, but it’s something you could conceivably try to help dampen the vibrations, and 2) the more direct approach is to get a a credible local contractor [a Handyman/Handywoman] in there to rip the old one out and install a new vent, properly, from scratch. If you make this slightly larger than the old one – you won’t need to worry about re-painting, which is definitely something to keep in mind. I, for one, would be losing my mind with vibrations like that – especially if I was trying to sleep… ;)
Hope this is of some help, and best of luck!
Thank you for this very informative, and “how to” article.
I’m in the process of a remodel, and my cold air return looks like a train wreck. Twenty-five years old… and looks Fifty.
It’s also warping, and sucking the filters inward. Just a complete disaster.
This has given me the confidence and the absolute resolution to jerk that horrendous eyesore out and put in something that looks appealing.
Thank you, again, for your time in compiling such a thorough piece.
Excellent Sam – really appreciate the kind words, and I’m sure you’ll have no problem at all. And once done… you’ll be very happy every single time you pass by the previous eyesore! If you like, take some before an after photos – and I’ll be happy to put them up here on the site. In this comment thread, just below. (You can get photos to us via the Contact Us page.) Best of luck to you!